In the Routes screen in the top of the screen, the routes are shown that are part of the project and need to be build, or the routes is part of the project or is related to an project object.
The routes are shown in a list, sorted alphabetically. The order can be changed by clicking a column header. The column order can be changed by dragging the column to the desired position.
When you double click on a record, the Edit screen is opened. Some fields may be edited here.
Two important parts of this page:
- A route must be in use, or be part of the export before the duct and/or sub-duct system can be delivered.
- Both the route, with the duct and/or sub-duct system must be in use, or be part of the export before a cable can be delivered.
Route
You can select any route by clicking the record in the top half of the screen. Additional information on the route's ducts will be shown in the center half of the screen.
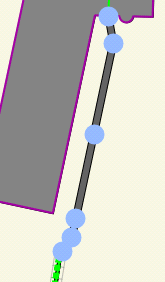
The route of the duct is shown in the bottom of the screen.
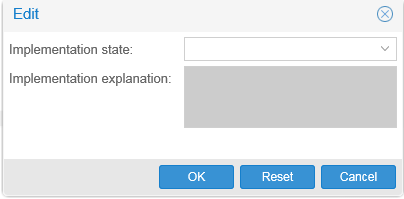
By double clicking the record, the Edit screen is opened. Here the section may be given an implementation state..
The information of the section route cannot be edited, the fields are grayed-out.
Ducts / Sub-ducts
In the middle of the screen the content of the section is shown.
By double clicking the record in the middle of the screen, the Edit screen of the duct or sub-duct opens.
Here the implementation state of the (sub) duct is given. You are required to give a reel number.
Please note: all sub-ducts have their own implementation state.
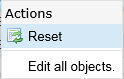
Grant all sub-ducts an implementation state
|
it is possible to give all sub-ducts an implementation state and a implementation explanation, by a single action. On the route, in the top of the screen, use the right mouse button to open the Actions menu. On a tablet, press and hold on the record.
The Actions menu (left) is shown, allowing the user to Edit all objects at once. When you select the option, a new screen opens. |
||
|
|||
Cable
By selecting a sub-duct, the cable part is also selected. If a different cable would be selected by the user, the sub-duct is also selected for that cable.
By double clicking the cable, an Edit screen opens and an implementation state may be given. Both a reel number and Length measurements (explained below) are required.
Please note: it is NOT possible for the user to change which cable is placed in a sub-duct, if there is a change in (sub)duct, the user will have to use the status 'Done differently'.
Depending on the Client, there may be additional requirements for delivering objects done differently.
Field Work has no option to show the entire route from start location to end location, in its geography.
If you want to see the entire route, please use the CoconTheWeb map, or complete connection report.

Length measurements
Example 1: no slack
If the design has specified a route, with no slack added to any accesspoint it passes through, than the accesspoint wont be shown when noting length measurements.
The accesspoint located on the route are simply not shown when entering measurement. Tip: In the map of CoconTheWeb, the route and additional accesspoint may be viewed.
The measurements markings on the cable must be entered in the cable's edit screen.

the measurements are taken as followed: The additional length as taken on location A, the cable inside the duct, the additional length as taken on Location B.
We use the point of entry (length in) and point of exiting (length out) to determine the markings, example:

Start location: location A (VW00-H005)
1: The marking where the cable exits the enclosure and enters location A. (point 1) The marking is taken in the length in field, of the first record.
2: The marking where the cable leaves the location A, and enters the duct B. (point 2) This is both the length out of the first record, and the length in at the second record. One entry updates both fields.
This length contains the additional length left at the location A.
Route: cable B (VW00-K001)
2: The marking where the cable leaves the location A, and enters the duct. (point 2) This is both the length out of the first record, and the length in at the second record. One entry updates both fields.
3: The marking where the cable exits the duct B and enters the location C. (point 3). This is both the length out of the second record, and the length in of the third record. One entry updates both fields.
End location: location C (VW00-H003)
3: The marking where the cable exits the duct B and enters the location C. (point 3). This is both the length out of the second record, and the length in of the third record. One entry updates both fields.
4: The marking where the cable enters the enclosure, thus leaving location C (point 4). This is the length out of the third record.
This length contains the additional length left at the location C.
Example 2 with slack
When the design has included an accesspoint in the route, that requires additional length (slack) it will show in the measurements that must be taken.
These are accesspoints noted as Slack in the registration, both in type and object name.You register any additional length in the accesspoint by taking the marking at both the duct where the cable is entering the accesspoint, and the marking at the duct where the cable is leaving the accesspoint.

Tip: If there is no standard or operation procedure agreed upon, please check with the client on guidelines (if any) for the handling of accesspoints that aren't part of route,
and the registering of additional length.
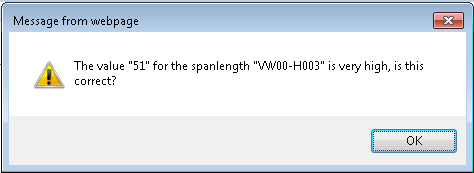
High span length ( >50)
If the additional length is over 50m a warning is shown.
|
The warning is shown, to notify the user of a value considered being to high. The value can be adjusted by the user if proven wrong.
If the value is correct, the value will be delivered. the warning is only shown after entering a value deemed to high.
The user is responsible for checking and correcting any values that are wrong.
|
Please note: when terminating a cable on the Location A, or Location B the cable's measurements will need to be adjusted.
Usually it is the splicer that enters the adjusted markings in the Field Work Enclosure tab. This can only be done after the cable has be delivered.
Removing a cable
When a reservation for removal is issued, the cable must be removed from the duct, or is cut at an location A / B side.

When the object is delivered with the status 'Done', the cable will be exported and processed accordingly.
Before the cable can be delivered with the status 'Done', all splices must be removed on the Enclosure.
When removing the cable, no markings have to be taken or adjusted on the cable.
Geography:
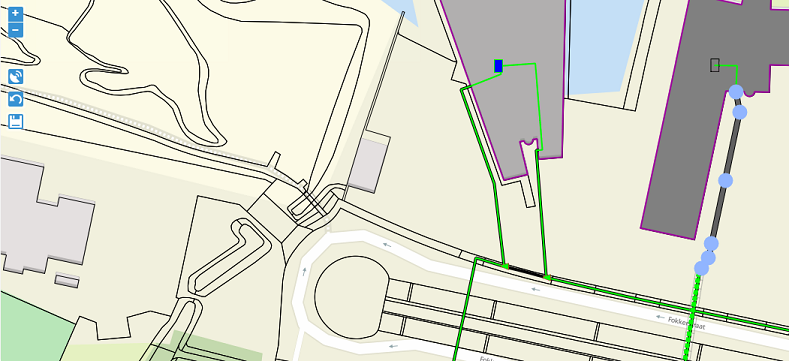
The selected route is shown in the Field Work geography.
|
Options:
|
Editing a route:
|
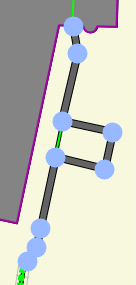
To change the route, first select the drilling in the geography.
|
|
|
|
By clicking anywhere on the green dotted line, new nodes may be placed. By clicking a node and holding down, the node is selected for editing. On a tablet, press and hold the node.
Drag the nod to the new location, to change the route.
By clicking once on a node, the node is removed. |
|
|
|
By using a combination of creating new nodes and dragging them to the correct location, the route can roughly be shaped to depict the adjusted duct route.
Please note: After changing the drilling route, use the save button. |

|
|
© Speer IT B.V. 1999-2018 |